Transactions & Refunds
For: operations managers processing payments and refunds day-to-day
What you'll learn: how to read payment status on an order, capture authorized payments, issue full and partial refunds, and understand how refunds affect order totals.
This is a how-to guide for the dashboard, not the API. If you're building an automated payment system instead, see the Admin API reference or the Usage Guide.
Before you start#
You'll need an admin login for your store and the Orders section visible in the left navigation. Every action in this guide starts from an order's detail page — open the order first by clicking it in the Orders list (see Order Processing for how to find an order).
Throughout this guide, screenshots use a demo store — the names, orders, and amounts shown are fake. All prices are decimals: $32,200.00 shows as 32200.00.
1. Understanding payment status#
When you open an order detail page, the Summary section at the top shows the financial breakdown. Four key fields tell you the payment picture:
| Field | What it means |
|---|---|
| Order Total | The full price of the order (items + shipping + tax, minus any discounts) — this is what the customer owes |
| Paid Total | How much the customer has actually paid so far |
| Outstanding | How much is still owed: Order Total - Paid Total |
| Payment Status Badge | "Not paid" (red) if Paid Total = 0; "Paid" (green) if fully paid; "Partially paid" if some but not all captured |
Example: An order has Order Total $32,200.00, Paid Total $0.00, Outstanding $32,200.00, and a "Not paid" badge. This order is waiting for payment capture.
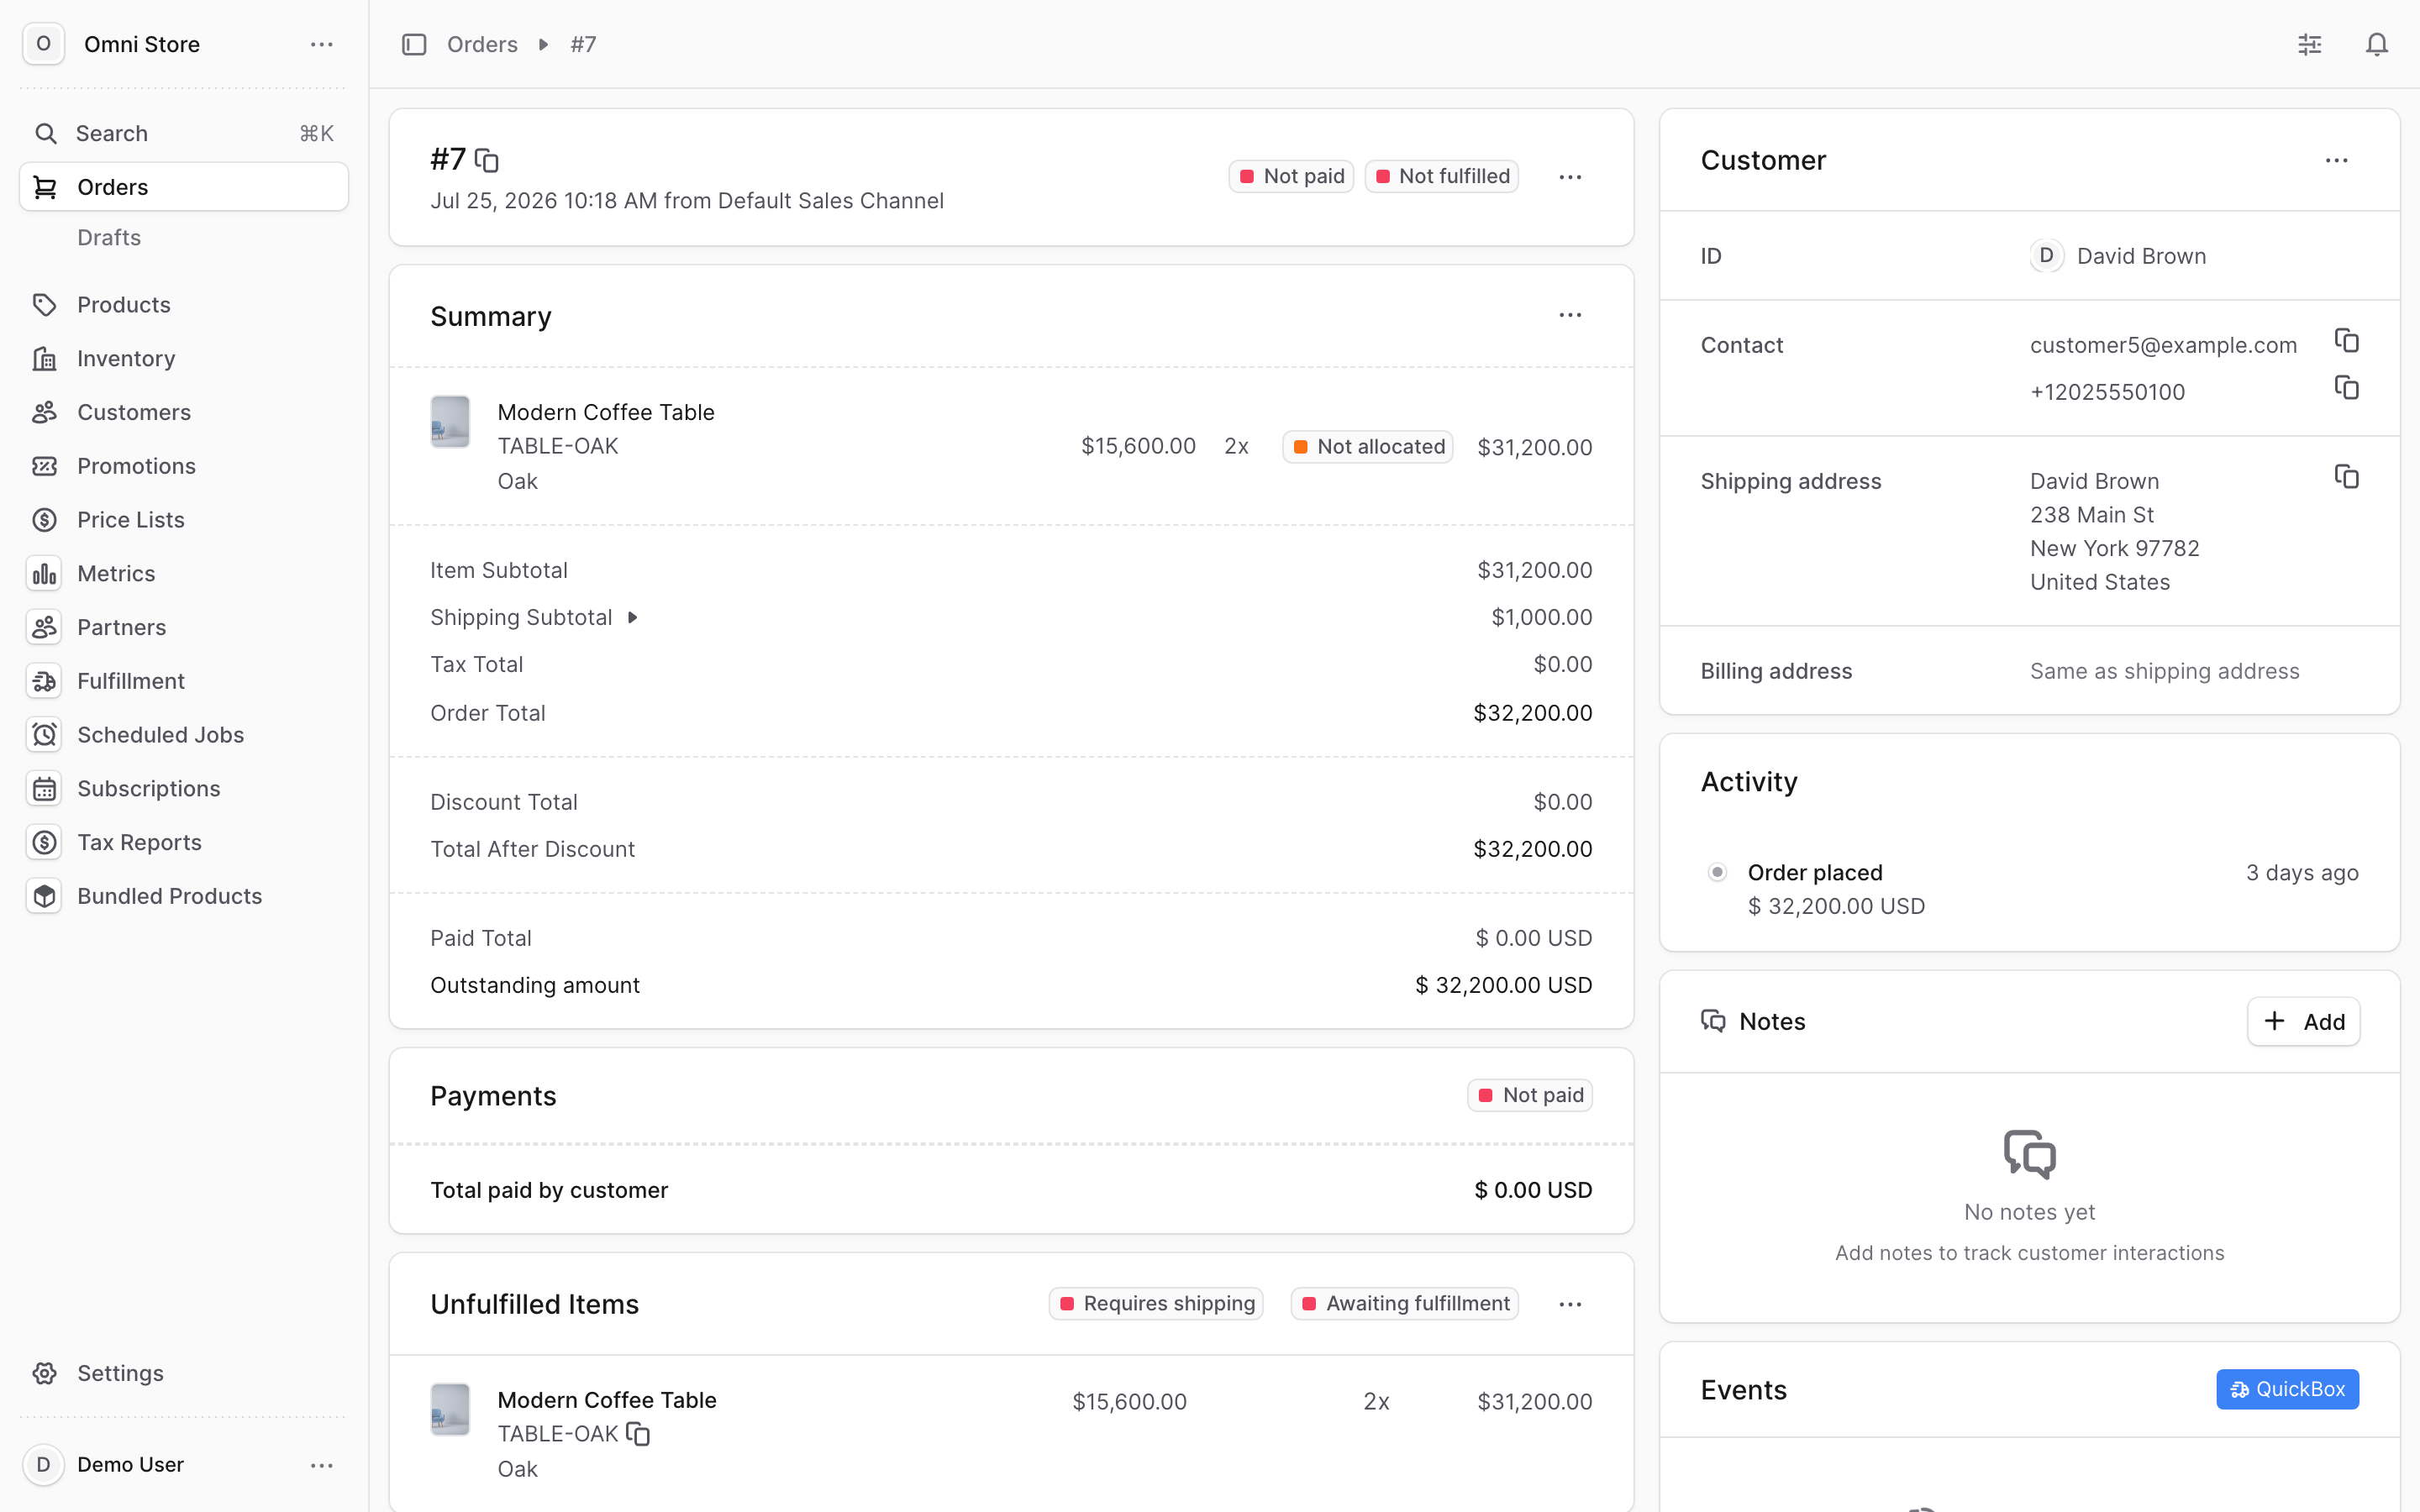
The Payments section below the Summary shows a "Total paid by customer" line and any payment method details.
2. Capturing a payment#
When a customer's credit card payment is authorized but not yet captured, the funds are held but not moved. You must capture the payment to complete the transaction.
When to capture#
- Customer paid at checkout but the payment shows as "Pending" or "Authorized"
- You're ready to fulfill the order and need confirmed funds
- The authorization window is closing (many cards auto-expire after 7 days)
How to capture#
- Open the order detail page
- Scroll to the Payments section
- Click Capture Payment (or the payment capture button in the order actions menu)
- Confirm the amount — it should match the Order Total
- Click Confirm to process
What changes after capture#
- Paid Total updates to match Order Total
- Outstanding becomes $0.00
- Payment Status changes from "Not paid" to "Paid"
- The Activity Timeline logs the capture event
- Customer receives a payment confirmation email (if automated emails are enabled)
Tip: If capture fails, the customer's card may have expired, been declined, or the authorization may have lapsed. Have the customer retry payment with a fresh card or contact your payment processor for details.
3. Issuing a full refund#
A full refund returns the entire Order Total to the customer's original payment method. Use this when a customer cancels before shipment or requests a refund for the whole order.
Caution: Refunds are difficult to reverse. Always double-check the order number and refund amount before confirming. If you refund the wrong amount or order, contact your administrator immediately.
How to issue a full refund#
- Open the order detail page
- Click Refund Payment in the Payments section (or use the order actions menu)
- The refund dialog shows the full Order Total — verify it's correct
- Click Confirm Refund to process
- The refund is sent immediately to the customer's payment method
What the customer sees#
- Their payment method shows a refund transaction (may appear within minutes or up to 2 business days depending on their bank)
- The customer receives a refund confirmation email (if automated emails are enabled)
- The funds appear back in their account within 3–5 business days (bank-dependent)
What changes on the order#
- Paid Total remains unchanged (it was $X, now still shows $X as a historical record)
- Payment Status changes from "Paid" to "Refunded"
- The Activity Timeline logs the refund with date, amount, and refund method
- A red refund badge appears in the Payments section
4. Issuing a partial refund#
A partial refund returns only part of the Order Total — useful for refunding a single item, a discount, or a specific amount the customer disputes.
How to issue a partial refund#
- Open the order detail page
- Click Refund Payment in the Payments section
- In the refund dialog, you'll see the full Order Total
- Change the refund amount to the amount you want to refund (use decimals: enter
100.00for $100.00) - Optionally, add a note explaining which item(s) or why (e.g., "Refund for damaged item - Modern Coffee Table")
- Click Confirm Refund
What changes on the order#
- Paid Total decreases by the refund amount
- Outstanding increases to show the new unpaid balance
- If the refund amount equals the Order Total, the Payment Status becomes "Refunded"; if less, it becomes "Partially Refunded"
- The refund appears in the Activity Timeline with the exact amount
Example: Order Total $100.00, customer paid in full. You issue a $40.00 refund for one damaged item. Now Paid Total is $60.00, Outstanding is $40.00, and the status is "Partially Refunded."
5. Reading a refunded order#
Once a refund is issued, the order tells a clear financial story through the Summary totals and payment timeline.
What you'll see#
- Order Total — unchanged (still shows the original total)
- Paid Total — reduced by the refund amount (or zero if fully refunded)
- Outstanding — shows any remaining balance
- Payment Status — "Refunded" (full refund) or "Partially Refunded" (partial refund)
- Refund badge — red badge in the Payments section showing refund amount and date
Activity Timeline entries#
The timeline shows:
- "Payment captured" — when the customer's payment cleared
- "Refund issued" — when you refunded money, with the exact amount
- "Refund applied" — confirmation the refund reached the customer's payment method
This record is useful for support follow-ups — if a customer says they didn't see a refund, you can check the exact date it was processed.
6. When NOT to refund#
Do NOT use the refund tool if items are coming back to the warehouse. When a customer is returning or exchanging items, use the Return or Exchange tools instead (see Returns, Exchanges & Claims).
The difference:
- Refund = just money back, no items expected to return
- Return = customer sends items back, then receives refund (warehouse tracks inbound stock)
- Exchange = customer sends items back, receives different ones in exchange
If you refund before items are received back, you lose track of inventory and customer accountability. Use Returns/Exchanges to keep the warehouse synchronized.
Quick reference#
- Read payment status: check Order Total, Paid Total, Outstanding, and the payment badge
- Capture a payment: when authorization is pending, click Capture Payment to move funds
- Full refund: verify the order number and amount, click Refund Payment, confirm
- Partial refund: change the refund amount in the dialog to the specific amount you want to refund
- Refunds are hard to reverse: double-check before confirming; contact admin if you refund the wrong amount
- Read refunded orders: Paid Total decreases; status shows "Refunded" or "Partially Refunded"; timeline logs the refund
- Items coming back: use Returns or Exchanges, not Refund (see Returns, Exchanges & Claims)
- Refunds take 3–5 days: the money goes back to the customer's card/bank; confirm via timeline, not customer email