Customers
For: support & operations staff looking up and managing customers in the admin dashboard
What you'll learn: how to find a customer, view their details (email, account type, order history, addresses, and groups), edit their information, and manage customer groups used to target promotions and price lists.
This is a how-to guide for the dashboard, not the API. If you're building an automated customer-management integration instead, see the Usage Guide.
Before you start#
You'll need an admin login for your store and the Customers section visible in the left navigation. If you don't see it, ask your administrator to grant customer access.
Throughout this guide, screenshots use a demo store — the names, emails, and customer information shown are fake.
1. Open the Customers list#
Log in to the admin dashboard, then click Customers in the left navigation. You'll see the customers list — everyone who has shopped or registered with your store.
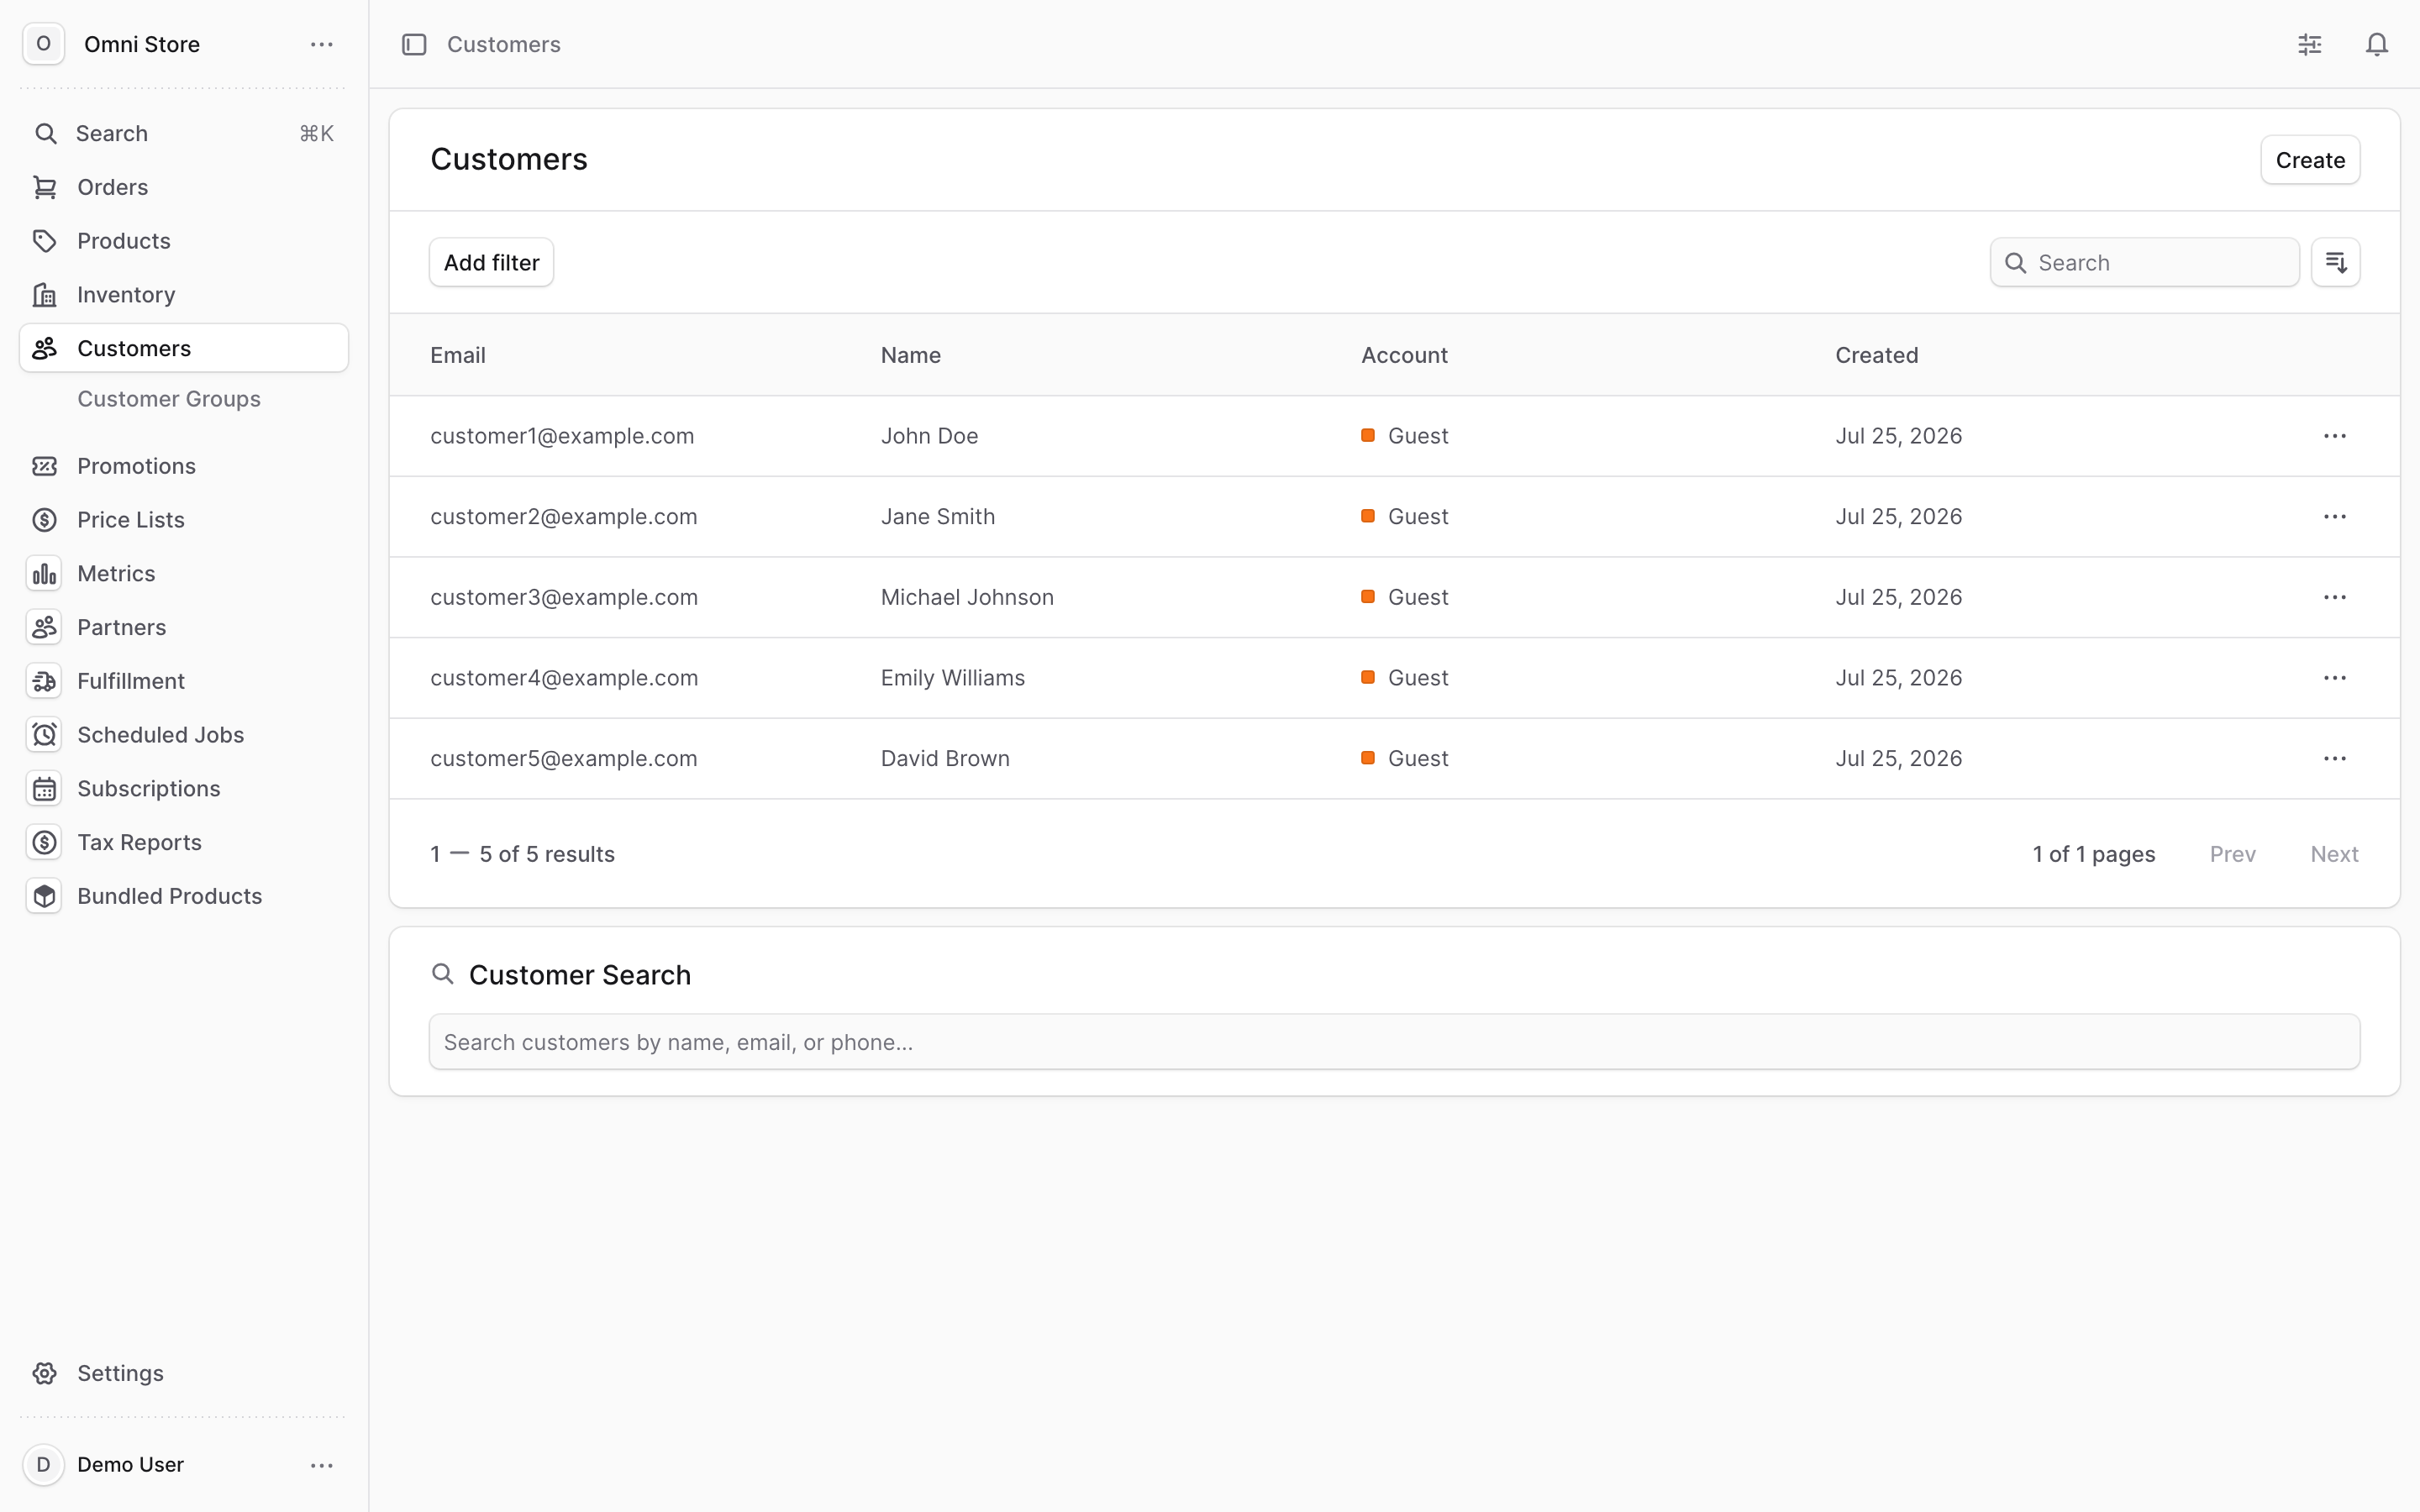
Each row shows:
- Email — the customer's email address
- Name — the customer's first and last name
- Account type — whether the customer is Registered (created an account) or a Guest (checked out without registering)
2. Find a customer#
Use the tools at the top of the list to narrow it down to the person you're looking for:
- Search — type a name or email into the search box to filter the list instantly
- Filter — narrow the list by available criteria (such as account type)
- Sort — order the list by a column, such as name or the date the customer was added
Tip: Searching by email is the fastest way to find a specific customer, since emails are unique. If a shopper says they can't log in, check whether their record shows as Guest — guests don't have an account and can't sign in until they register.
3. Open a customer's details#
Click any row to open that customer's detail page. This is where you'll find everything the store knows about them.
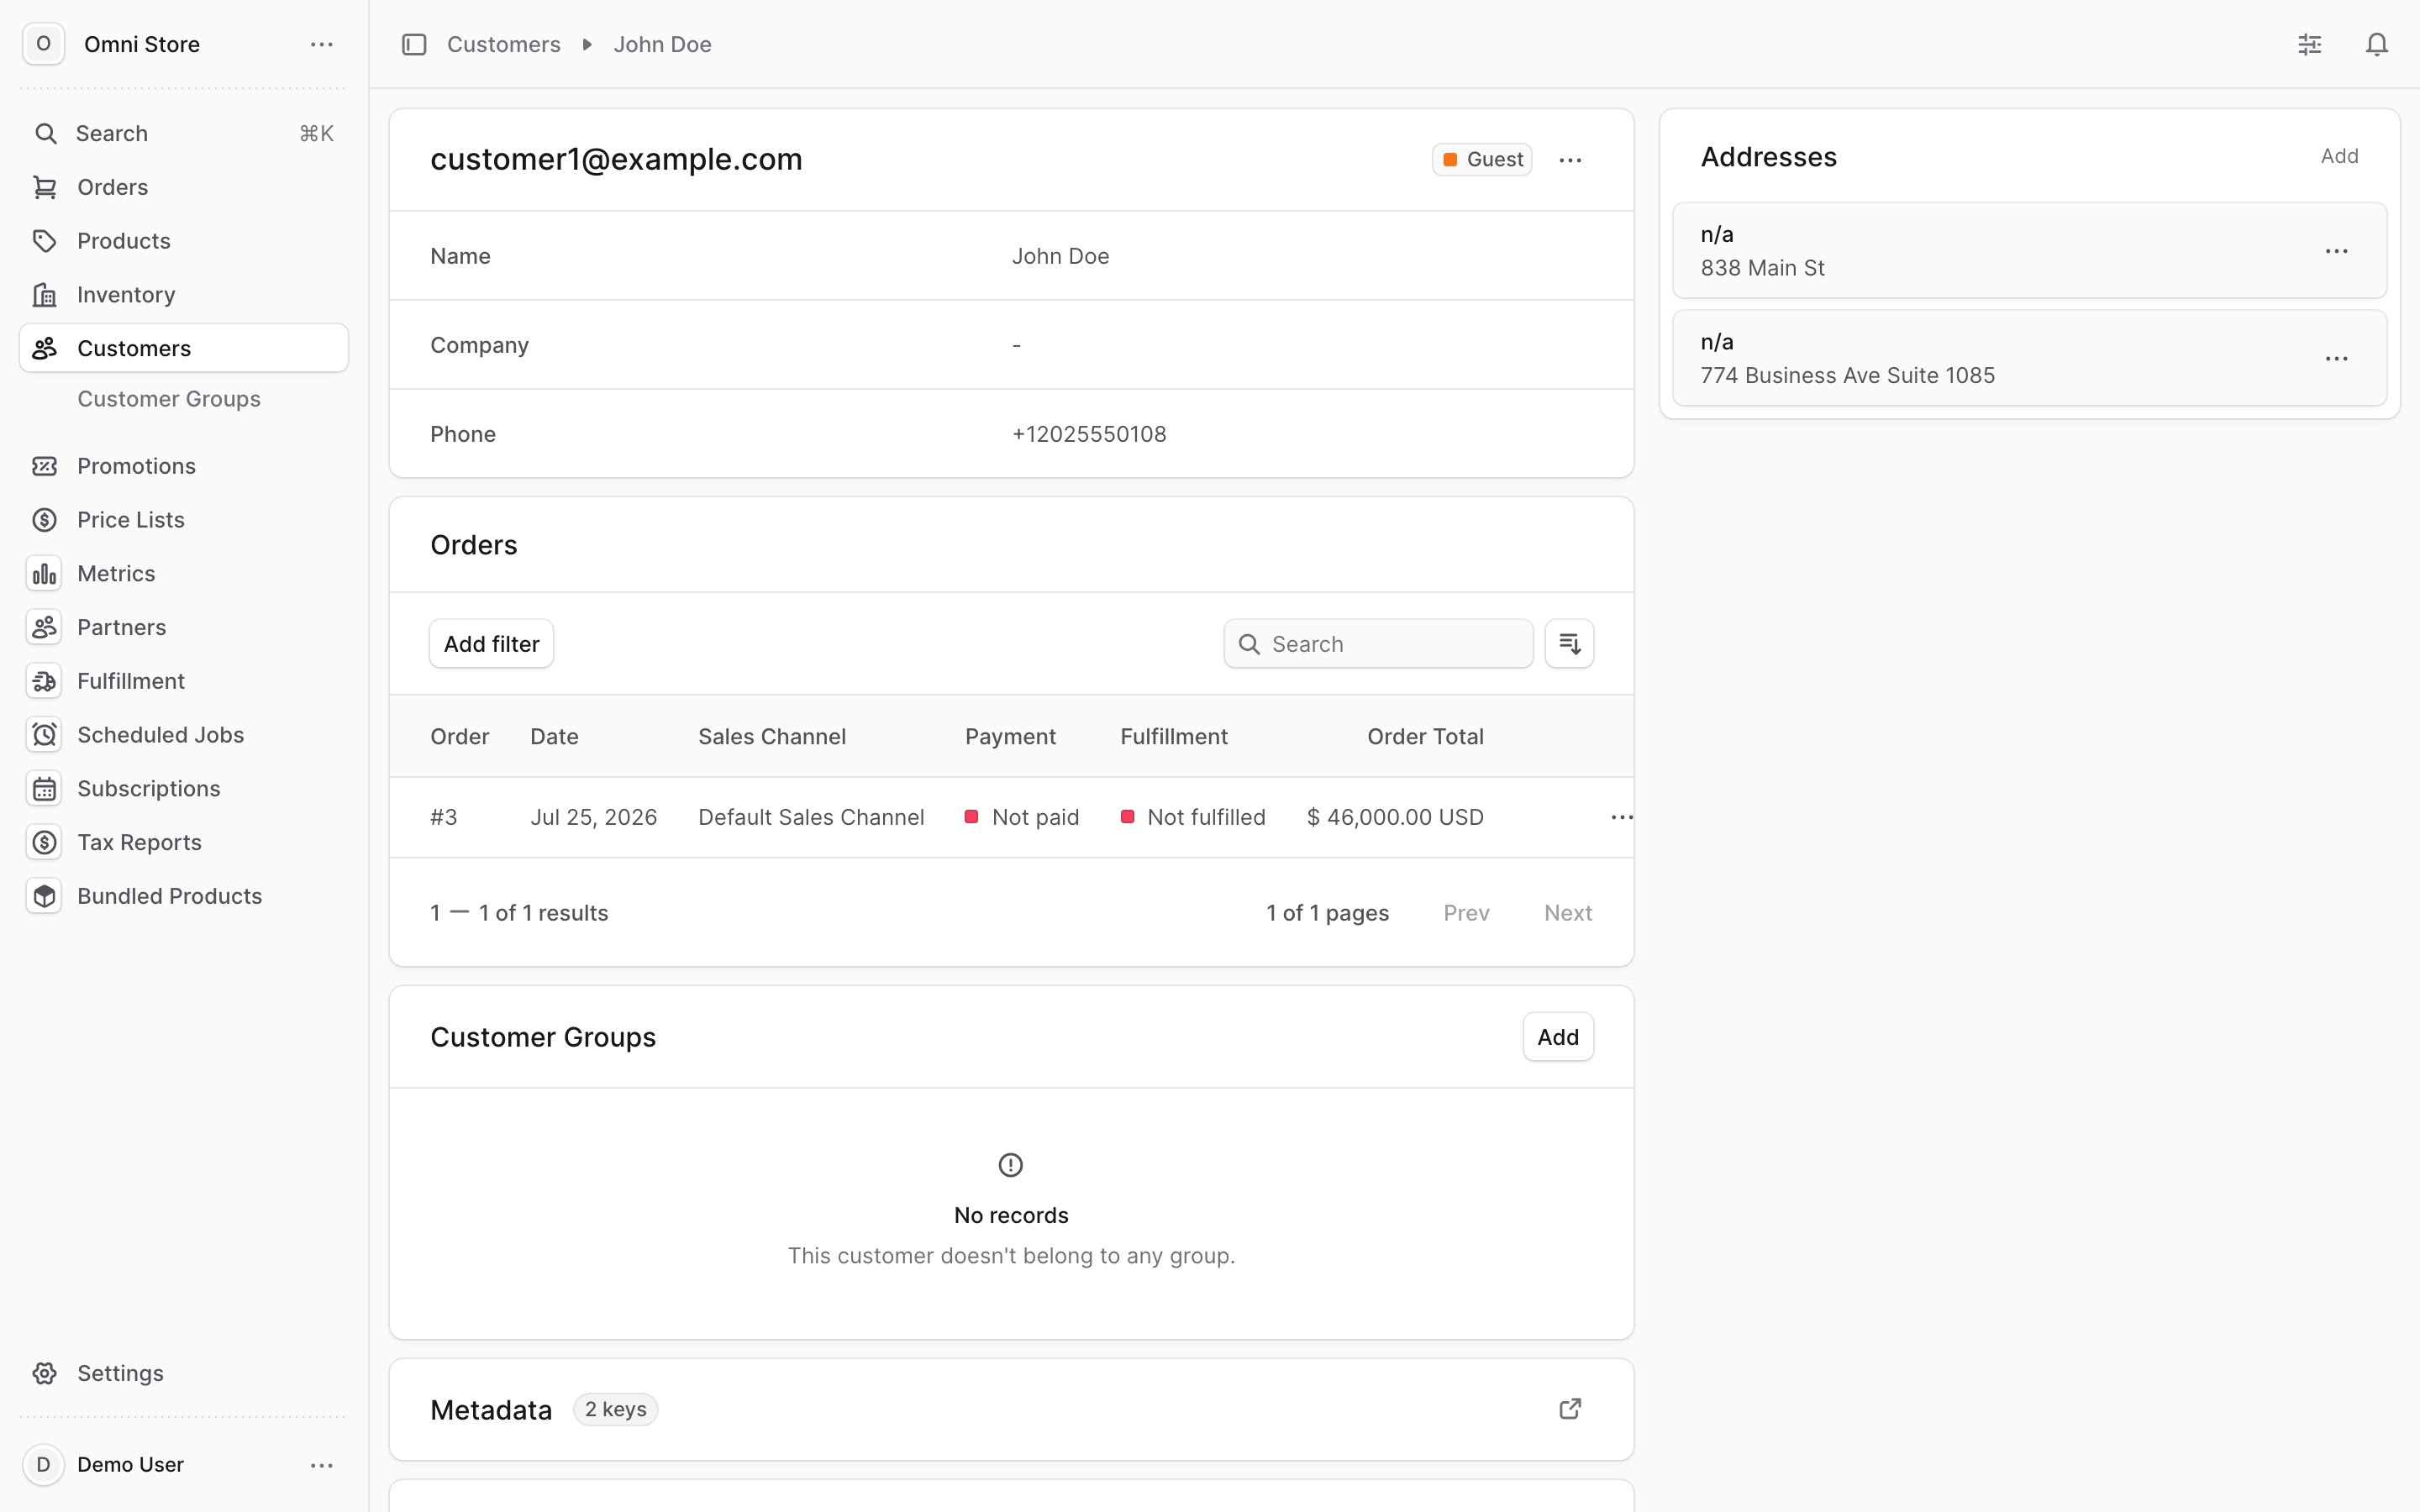
At the top of the page you'll see the customer's name, email, and an account type badge showing Registered or Guest.
The page is organized into sections:
| Section | What it shows |
|---|---|
| Customer Groups | The groups this customer belongs to, with an Add button to assign more |
| Orders | The customer's order history — every order they've placed |
| Addresses | Saved shipping and billing addresses, with an Add button |
| Metadata | Optional custom key-value data attached to the customer |
To review a customer's purchases, look at the Orders section — click any order to open its full record. For working with an order (payments, fulfillment, refunds), see the Order Processing guide.
4. Edit a customer's information#
To update a customer's profile:
- On the customer's detail page, click the three-dots menu in the header.
- Choose Edit. A side window opens with the editable fields.
- Update any of the following, then click Save:
| Field | Notes |
|---|---|
| Email address | The customer's contact and login email |
| First name | |
| Last name | |
| Company name | Optional — useful for business or wholesale customers |
| Phone number |
Tip: You cannot change a customer's password from the admin dashboard. If a customer is locked out, they need to reset their password themselves from the storefront login page.
5. Manage a customer's addresses#
A customer's saved addresses appear in the Addresses section of their detail page.
To add an address:
- Click Add in the Addresses section header.
- Fill in the address details — name, address line, apartment, postal code, city, country, state, company, and phone.
- Click Save.
To remove an address:
- Click the three-dots icon on the address row.
- Choose Delete.
- Confirm by typing the address name when prompted.
Caution: Deleting an address is permanent and cannot be undone. Make sure you're removing the right one — confirm the customer isn't relying on it for a pending or recurring order before you delete it.
6. Add a customer to a group from their page#
You can assign a customer to one or more groups directly from their detail page:
- In the Customer Groups section, click Add.
- Check the boxes for the groups you want to assign.
- Click Save.
To take a customer out of a group, check the group(s) in the Customer Groups section, press R (or click Remove at the bottom of the page), and confirm in the pop-up. Removing a customer from a group only unlinks them — it doesn't delete the customer or the group.
7. Understand customer groups#
A customer group is a way to segment customers by shared criteria — for example, VIP shoppers, wholesale buyers, or a loyalty tier. Groups exist so you can:
- Target promotions — apply a promotion to a specific group instead of every shopper
- Offer different pricing — attach a price list to a group so those customers see special prices
To see all groups, go to Customers, then open the Customer Groups page. You can search and filter this list the same way as the main customers list.
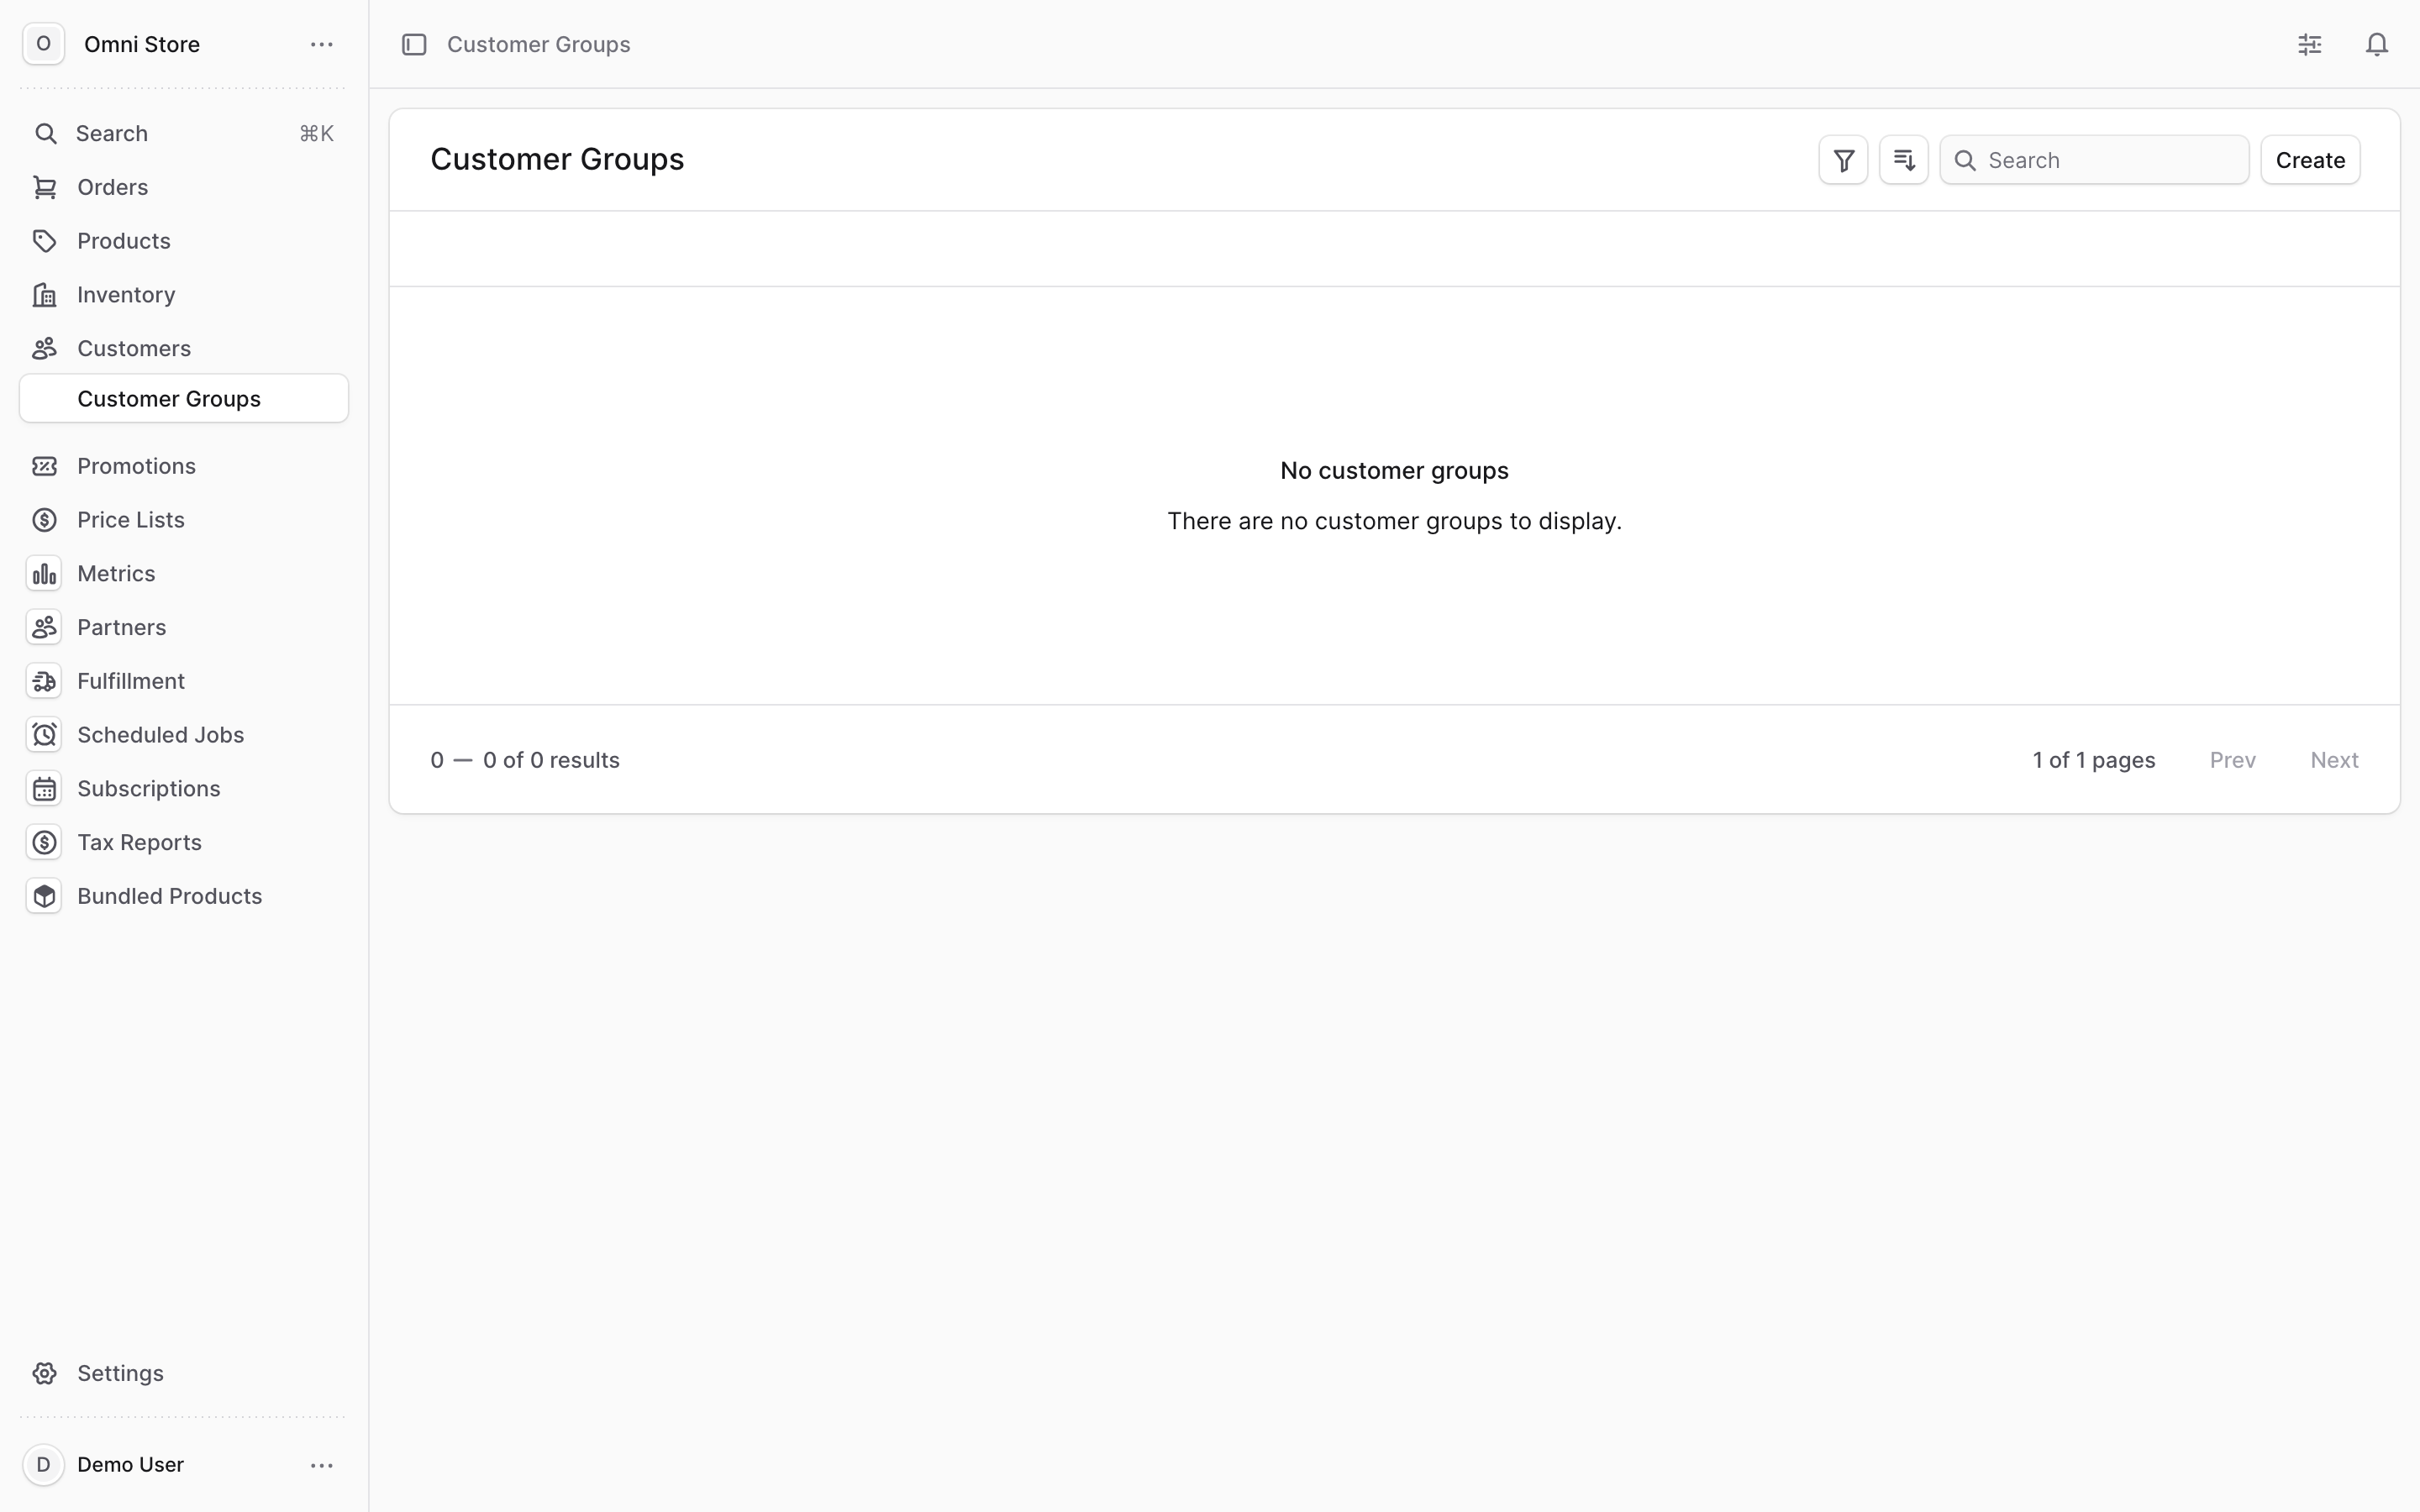
8. Create a customer group#
- Go to Customers → Customer Groups.
- Click the Create button.
- Enter a group name in the form (choose a name your team will recognize, such as "VIP" or "Wholesale").
- Click Create to save.
The new group appears in the Customer Groups list. Open it to add customers.
9. Add customers to a group#
Once a group exists, you can add customers to it in bulk from the group's page:
- Go to Customers → Customer Groups and click the group to open its detail page.
- In the Customers section, click Add.
- Check the boxes next to the customers you want to include.
- Click Save.
To remove customers from the group: check the boxes next to the members you want to remove, press R (or click Remove at the bottom of the page), and confirm in the pop-up. This only removes them from the group — the customer records themselves are untouched.
Tip: Keep group membership tidy. Because promotions and price lists are tied to groups, adding or removing a customer changes which deals and prices they see the next time they shop.
10. Edit or delete a group#
To rename a group:
- Open the group's detail page.
- Click the three-dots menu in the header and choose Edit.
- Update the group name in the side window and click Save.
To delete a group:
- Open the group's detail page.
- Click the three-dots menu and choose Delete.
- Confirm in the pop-up.
Caution: Deleting a group is permanent. The customers in it are not deleted, but any promotions or price lists tied to that group will no longer apply to those customers. Double-check that no active promotion or price list depends on the group before you delete it.
Quick reference#
| Task | How to do it |
|---|---|
| Find a customer | Click Customers → search by name or email |
| See account type | Check the Registered / Guest badge on the row or detail page |
| View order history | Open the customer → Orders section |
| Edit customer info | Open the customer → three-dots menu → Edit → Save |
| Add an address | Customer detail → Addresses → Add → Save |
| Add to a group (one customer) | Customer detail → Customer Groups → Add → Save |
| Create a group | Customers → Customer Groups → Create → name it → Create |
| Add customers to a group | Open the group → Customers → Add → check boxes → Save |
| Rename or delete a group | Open the group → three-dots menu → Edit or Delete |